LILO Splash Screen Example
Prerequisites
I presume that you ...- ... know what The GIMP is.
- ... have already installed and activated The GIMP.
- ... know how to accomplish simple drawing activities.
- ... have already installed the LILO Splash Screen Script-Fu.
- ... know how to activate the LILO Splash Screen Script-Fu.
- ... know what you want ;)
Index
six steps to your fancy splash screen ...- painting a fancy picture
- selecting an area for the selection box
- possible adjustments and script arguments
- image conversion with style ...
- running mklilomsg to "patch" the image
- configuring LILO (lilo.conf)
Step 1: Painting a Fancy Picture
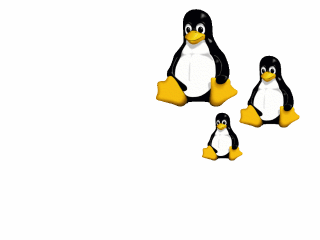
In this example I start with an empty white image (RGB mode) 640 × 480 pixels of size.

Then I add some penguins to this snowy area ... (you can find them at Larry Ewing's page)
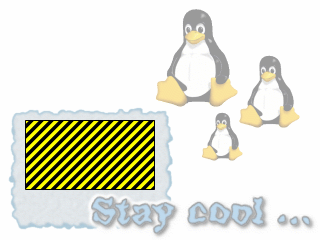
Now we add some fancy writing and an area for the boot menu LILO will display ...

Step 2: The Boot Menu Area
Now it's time to fix the area for the LILO Boot Menu.
In this example I select the area from (50,240) to (310,380), an area of 260 × 140 pixels.
Step 3: Adjustments and Script Arguments
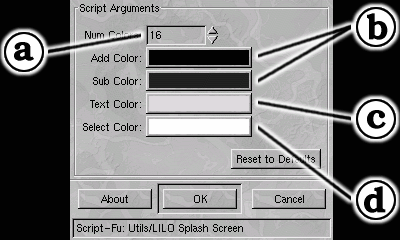
At this point we should have a look at the different adjustments we can make prior to the image conversion.- Num Colors (a)
This is the number of colors reserved for the Boot Menu area.
The script will reserve twice as many colors because half of them are used for normal visualization, and the rest for the inversion done to display the Menu Selection Bar. - Add/Sub Color (b)
These are the color values used for manipulating the second half of the reserved colors.
The script simply adds the Add Color and substracts the Sub Color for each color identified, clipping each component (R,G,B) to the allowed range (0-255). - Text Color (c)
This is a color which is added to the final indexed palette at the first available index (Num Colors).
It will/can be used to draw the text of the unselected Menu Items. - Select Color (d)
This color is added at the last available index (255 - Num Colors).
It will/can be used to draw the text of the selected Menu Item.
Step 4: Image Conversion
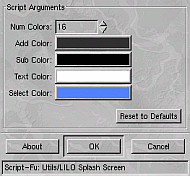
In this example I decide to make the selection somewhat icier (more white) and to use a white color for the frozen (unselected) menu items and a blue color for the thawing (selected) one. Sixteen colors should be enough for the menu bar area, so I leave this default value unchanged. The complete adjustments look like shown below, and the resulting palette is given right beside (with the picture colors dimmed so you can see the menu colors and the text/selection colors at index 16 and 239).
It is important not to forget that the image must be flattened and in RGB/Grayscale mode. After the conversion simply save the image as PCX file.
Step 5: The "mklilomsg" Arguments
Let's take a look at the help from the mklilomsg utility ...
mklilomsg: Usage mklilomsg <options> message

  At least one of these options must be given:
    --logo1 logo1 <menu parameters>
    --logo2 logo2 <menu parameters>
    --message text_message

  logo1 and logo2 must be PCX graphics files (256 color palette);
  text_message is an alternative text message shown when the user
  leaves the graphics screen.
  logo1 should have a size of either 640x400, 640x480 or 800x600;
  logo2 is intended as a fallback if the graphics card cannot handle
  VESA modes and should have a size of 320x200.

  <menu parameters> are 12 numerical parameters (all required):
    bar_width, bar_height         menu bar size
    item_height                   line height
    item_startx, item_starty      menu position (upper left corner)
    item_xofs, item_yofs          text offset relative to the menu bar
    max_items                     maximum number of menu entries shown
    font                          text font; one of 0x11, 0x12, 0x13
                                  (8x8, 8x12, 8x16 pixel)
    normal_text, selected_text    color of normal & highlighted text
    xor_val                       the menu bar is drawn using this xor value
Now the only thing left to do is to map our gathered
information onto a command line call for the
mklilomsg utility.
The bar_width will be the width of our menu area (260) and the bar_height should be somewhat larger than the used font (for example 22). The item_height will be the distance between the baselines of two consecutive items (for example 25). The item_startx and item_starty give the upper left corner of menu area (50,250) and the item_xofs and item_yofs the offset within the menu bar (for example 16 and 4). Our menu area will in this case hold a maximum of five (5) entries using a 16 pixel font (0x13). The normal_text and selected_text values are set to color index 16 (text-color, white) and 239 (sel-color, blue), the xor_val is set to 0xff which means total inversion mapping color indices 0,1,2,...,14,15 onto 255,254,253,...,241,240.
... so the complete command line would be ...
   mklilomsg --logo1 <path-of-the-pcx-file>
   	260 22 25 50 250 16 4 5 0x13 16 239 0xff
	>/boot/message
Step 6: The "lilo.conf" Setup
Simply add or change the
message = /boot/message
option in the configuration file.
You might also add/change the folowing options (from the lilo.conf man page) ...
menu-title=<title-string>
Specifies the title line (up to 37 characters) for
the boot menu. This title replaces the default
"LILO Boot Menu" title string. If boot-menu.b is
not installed as the boot loader (see install=
option), then this line has no effect.
menu-scheme=<color-scheme>
The default color scheme of the boot menu may be
overridden on VGA displays using this option. (The
color scheme of MDA displays is fixed.) The gen
eral color-scheme string is of the form:
<text>:<highlight>:<border>:<title>
where each entry is two characters which specify a
foreground color and a background color. Only the
first entry is required. The default highlight is
the reverse of the text color; and the default bor
der and title colors are the text color. Colors
are specified using the characters kbgcrmyw, for
blacK, Blue, Green, Cyan, Red, Magenta, Yellow, and
White: upper case for intense (fg only), lower case
for dim. Legal color-scheme strings would be
menu-scheme=Wm intense white on magenta
menu-scheme=wr:bw:wr:Yr the LILO default
menu-scheme=Yk:kw bright yellow on black
If boot-menu.b is not installed as the boot loader,
then this line has no effect.
Finale
At this point everything is prepared and the only thing left for you to do is to invoke lilo to activate the new, fancy boot screen ...
Remember that I take no responsibility for whatever you do to your boot configuration, accidentially or on purpose, but anyhow, enjoy!
Resources
- The GIMP layered image of this fancy Boot Screen.
- The Boot Screen PCX image with the mklilomsg options already applied.
|
visits to this page. | ©2001 Herbert Pötzl |